I recently remodeled my master bedroom’s walk-in closet with a wrap-around closet organization system. In the midst of planning the job, I decided that I wanted more than just the overhead lighting – I wanted LED lighting on each of the shelves in the new organizer. In the guide below, I’ll take you through the process I followed to upgrade my shelves with built-in LED lighting.
Search Google for “LED light strip” or “LED light bar” for a taste of how many products are on the market in these categories. I considered using LED light bars, but I had shelving sections of different widths. With this being the case, I felt I would need to either have the same light bar in spaces of different sizes, or find more than one light bar in the same family of products. Even if I’d found what I wanted in terms of sizing for LED light bars, I wasn’t crazy about having something hanging down from the shelf that I could potentially knock loose in the future.
Finding no satisfaction down the light bar avenue, I started looking at “LED channel”. LED channel is a thin metal product that you fasten to your shelving. You then lay your LED strip lights within the channel. Lastly, you install the channel’s diffuser to close out the channel. The diffuser conceals the LED strip itself and helps to distribute the light more evenly.
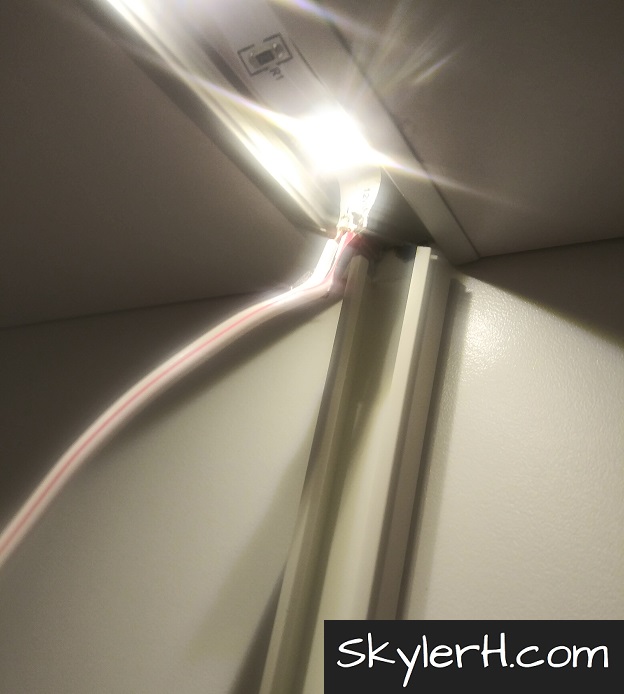
The finished job will give you a clean, seamless appearance; it’s as though the LED lighting was built into the shelving from the manufacturer. Using LED channel and LED light strips, here is an example of the result I was able to achieve on my custom shelving project:

Contents
How to upgrade your shelving with built-in LED strip lights
- Purchase materials
- Gather tools
- Route the shelving
- Cut the LED channel
- Install the LED channel
- Install the LED strip lights
- Mount the shelving & conceal the wiring
- Additional resources
Purchase materials for your LED lighting project
First things first: you’ll want to order all of the material you’ll need to do the job. As I mention above, there are a million options out there for LED light strips, LED channel, wire, connectors, LED channel, and other gear from this family of products.
Here are the materials you’ll need for this LED project (depending on how you execute the job):
Before ordering your material, the first thing you’ll need to do is measure your shelving to figure out how much LED lighting equipment you’ll need. For most jobs, you can probably tackle this step with a tape measure, pencil, and a piece of paper. For my walk-in closet remodel, I actually drew up a 3D model of my closet using SketchUp. This allowed me to plan every aspect of the job, from laying out the modular sections of the closet organizer, to planning the route of the wiring for the LED light strips.

Know how much you need
Whatever your means of measurement may be, make sure to get a good estimate of the lengths you’ll need. Better to buy a little extra than to be a little short; this is especially the case if you’re paying shipping charges to get the material in. For this reason, as with any project, it’s typically recommended that you oversize your material estimate by at least 10%.
If you have more than you need, you have material to cover any waste or mistakes that occur throughout the installation. If everything goes well, you’ll have a little left over in case something’s damaged in the future, or even for use on another project. Having less than you need, however: no bueno!
The shelving itself
Now, maybe it goes without saying that you’ll need the shelving itself. Perhaps you already have shelving that you’ll be pulling down and modifying, or maybe you’re putting up new shelving. As you can see in the image above, I was adding a lot of shelving, but I wasn’t purchasing it shelf by shelf. The shelving I used came from 2 white melamine Ultimate Corner System kits. What I mean to say here is that I’d imagine you could build LED channel into virtually any wood shelf.
LED light strip
To start with, you’ll need the LED strip light itself. For my project, I needed more than 90′ of LED lightstrip, so I ordered 2 kits that each powered two 26′ strip lights (for just over 100 feet).
To be clear, there are a lot of choices to be made in deciding what type of LED strip light to purchase. For instance:
- Do you want warm white (more yellowish, like incandescent lighting) or cool white (more bluish, as you see from some CFL’s, LED’s, etc.)? (Click to read more about Color Rendering Index and warm/cool light)
- Do you want to be able to dim the strip?
- Do you want a remote control?
We could spend years discussing these options. To boil it down:
- I wanted several long runs of warm white LED strip lights, and I didn’t need a lot of frills
- My plan was to trim the LED light strips to size for my shelves. As such, I needed strips that were cuttable
- Finally, I chose LED light strips that were white only (versus RGB LED strips, which can produce millions of colors).
I did so because I knew I would be soldering connections between my LED lightstrips, and it’s a lot easier to solder 2 connections between strips than 4. To elaborate, many white-only strips have only two electrical connections between segments (+12V & 0V), whereas RGB strips typically have four connections. Here is the well-rated LED strip light kit I purchased for my custom LED lighting project:
LED channel
Secondly, you’ll need the LED channel. There are several families of LED channel out there, but I picked up the “recessed” LED channel (or what 1000bulbs refers to as “shallow with lip”). The kit I found on Amazon was much more reasonably priced than some of the other options I found out there.
As I say, there are a lot of choices on the market in regards to LED channel. I wanted the recessed channel because I wanted a product that would give me the most seamless, “from-the-factory” look for my built-in LED lighting upgrade. I chose a shallow channel as my shelving material is 5/8″ melamine… If the channel were much thicker, it would be thicker than the shelf itself!
To make a long story short, here is the type of LED channel I used:
Wire for your LED lighting project
Next, let’s look at wiring for your LED lights. Unless you have a separate controller for each LED light strip on each shelf, you’ll need to electrically connect one segment of light strip to the next.
LED strips typically have very low power consumption. With that said, you need to size the wiring appropriately for the amount of power you’ll need to provide to the LED light strips.
Many LED strip lights work on 12V power supplies. Assuming 12V LED strips, for a small or low power project, 22-gauge wire will likely be sufficient to power your LED light strips. For longer or higher power runs, 18-gauge or 16-gauge wire (have any speaker wire laying around?) should do the trick.
But, don’t take my word for it; make sure to use wiring of an appropriate gauge to avoid the risk of fire. You can use the following resources to help determine what’s appropriate given your situation:
How to determine what wire gauge you’ll need for your LED lighting
Basically, here’s the process:
- Look at your LED light strip’s specs to find its “watts per foot” power consumption
- Multiply the number of feet of LED strip you’ll be running in a given segment by the watts/ft value
- Divide the resulting total segment wattage by the voltage of your LED lighting system (e.g. 12V)
- This result gives you the amperage consumed by that segment of your system
- Refer to the charts above (or other resources) to determine what AWG wire is required
- If in doubt between two gauges, err on the side of a lower gauge wire (a lower AWG wire is a thicker wire that can carry more amperage)
With all of that in mind, here is the type of wire I used for my project (although the type I had laying around was solid conductor instead of stranded):
Wire connectors
I soldered all of my electrical connections between each segment of my LED strip lighting project. If, however, you’re not interested in breaking out the old soldering iron, there are connectors you can buy to terminate each LED light strip.
If you choose to buy connectors, just make sure you buy connectors that are designed for your LED striplights:
- The connector should be designed for the width of LED strip you’re using (8mm, 10mm, 12mm)
- The connector should have the same number of connections as the LED strip you’re using (2-pin, 4-pin, 5-pin)
Here’s an example of a pack of connectors for an 8mm, 2-conductor LED strip:
Screws to fasten down the LED channel
You’ll need some small screws to secure the LED channel to your shelving. My kit came with little metal clips that you’re supposed to fasten down into the shelf. After you fasten down the clips, you’re supposed to snap in the LED channel.
I didn’t end up using these clips. The LED channel did snap into the clips quite firmly, but I found the combined apparatus (clip fastened into board, channel snapped into clip) was not as secure as I wanted it to be.
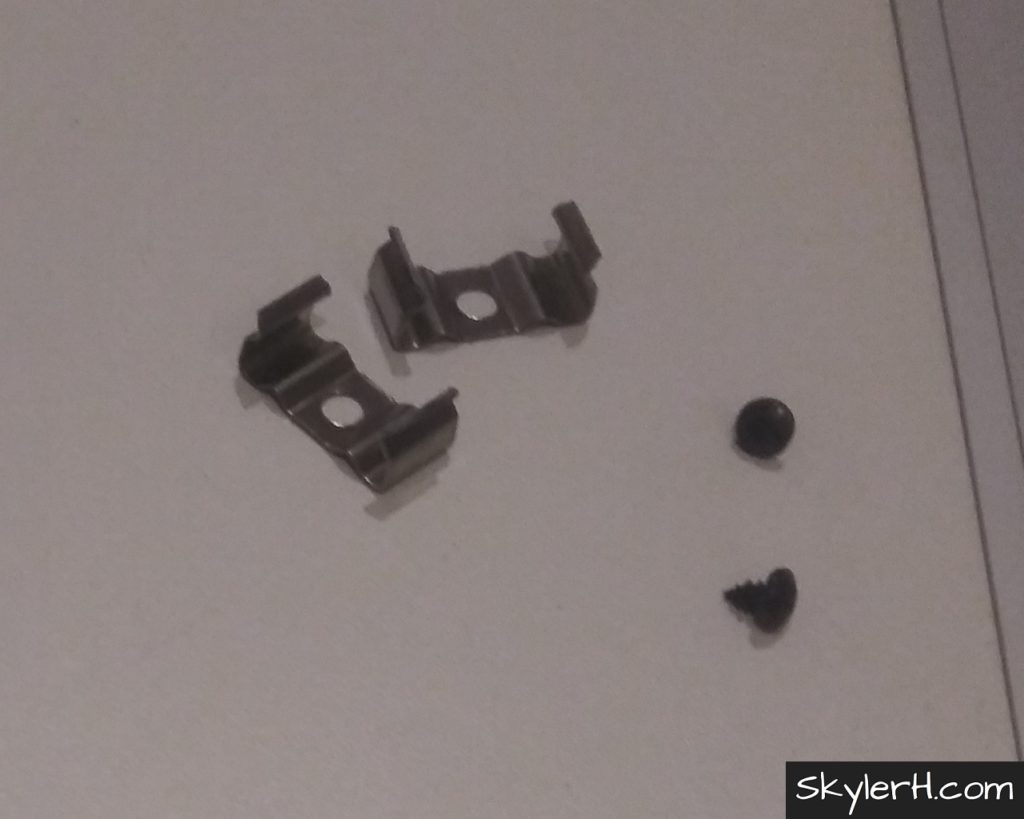
As a result, I decided to fasten my LED channel directly to the shelving with small sheet metal screws. Depending on which LED channel kit you purchase, it may come with screws that you can use for this purpose.
Check the length of your screws
I would strongly suggest that you size the screws up against the wood before attempting to install them. What I mean to say is that if the screws are too long, they’ll punch through the other side of your shelving when you try to fasten down your LED channel. So, you’ll need to be careful to select screws that are sized appropriately for your application. Here’s something like what you need to figure:
- The board I used was 5/8″ thick
- I routed a groove through the board, into which the LED channel sits
- The LED channel sits ~1/4″ below the surface of the board
- That means there is 5/8″ – 1/4″ = ~3/8″ between the upper surface of the LED channel and the bottom surface of the board
- Therefore, ~3/8″ is the absolute longest that my screw could be (and 3/8″ may be too long)
Here’s an image to summarize what I’m trying to say visually:
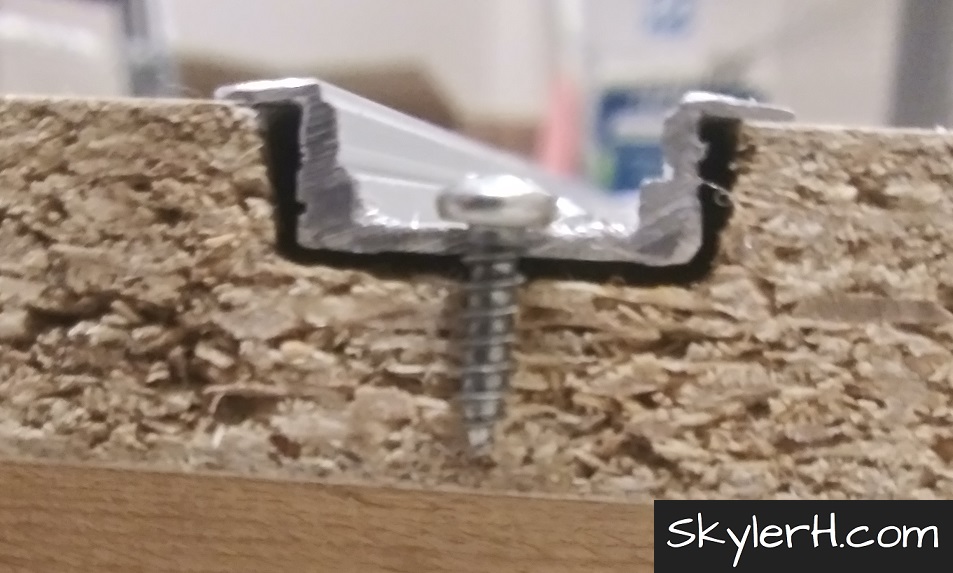
Basically, make sure that the screws you use to fasten down your LED channel won’t pierce through the opposite side of your shelf. The screws that come with the LED channel may be too long; make sure to check before you damage your work. I picked up sheet metal screws with a relatively low head for this job.
Cord cover
Lastly, you’ll likely need some cord cover (or wire tray, or cord concealer, or whatever you’d like to call it) to hide the wiring from the outlet to your LED channel. Assuming you’re not running low voltage wiring through the wall, cord cover can give the wiring for your LED lighting project a clean, finished look at a reasonable cost.
For my project, I needed quite a bit of cord concealer. Specifically, I needed more than 30 feet total throughout my wrap-around closet organizer. For this reason, I considered many kits and found one that would do the job at a good price. The following kit was easy to install, and was also very affordable:
Gather tools
Once you’ve figured out what materials you’ll need for your built-in LED lighting project, it’s time to round up all of your tools and equipment.
There’s always more than one way to go about a job, so I’ll provide a couple of options for certain tasks, depending on the gear you have available and your budget. Let’s take a look at what you might need to upgrade your closet, cabinet, or storage shelving with built-in LED channel:
Tools & equipment needed by task
Miscellaneous
- Safety glasses
- Ear protection
- Respirator or dust mask
- Gloves
- Pencil
- Black marker
- Tape measure
- Extension cord(s)
- Electrical tape
Routing the shelves
- Router
- The right router bit for your LED channel* (“Note on router bits” below)
- Guidance for your router
- A higher-grade option: a router table
- OR
- An inexpensive option:
- OR
- Some very inexpensive options:
- Saw horses or a work bench, and:
- The (usually cheap and inaccurate) edge guide that comes with the router
- OR
- Clamp down a 2×4 or other material with a very straight edge
- Saw horses or a work bench, and:
*Note on router bits:
Size your router bit just wider than the width of your LED channel. If you purchased the LED channel from the link above, you’ll note from its product listing that the outer width of the concealed portion of the channel is 17.5 mm:

To size your router bit:
- Convert channel width to inches:
- 17.5 mm / 25.4 = ~0.688976 in
- Make sense of that decimal by multiplying by 32 (gives you 32nd’s of an inch):
- ~0.688976 in * 32 = ~22.0472/32 in
- Since you got an even number of 32nd’s (around 22), divide numerator and denominator by 2 until you have reduced the fraction to simplest terms:
- (22.0472/2) / (32/2)” = ~11/16″
So, your channel itself is around 11/16″ wide. In fact, it’s just larger than 11/16″ (considering the 0.472/32″ that we discarded in step 3). Rounding up to the next 16th for the size of the router bit should give you a groove with enough clearance to insert the LED channel. Therefore, if your channel is 11/16″ in width, a 12/16″ – meaning 3/4″ – router bit should do the job nicely.
My understanding is that there are generally two types of router bits: high speed steel, and carbide. Between the two, carbide bits are supposed to last longer.
For my project, I routed channels that were just under 3/8″ deep. I did this through approximately 20 meters worth of melamine board with a high speed steel bit made by Bosch.
While I did finish the job with the one bit, it is not in the best of shape at this point (top corners are rounded off, some burning, etc.). So, it may be worth the money to get carbide bits. Please feel free to share your thoughts on this in the comment section at the bottom of this page.
Installing the LED channel
- Something to cut your LED channel with:
- An inexpensive option:
- A much faster (but more expensive) option that will give you nice cuts:
- A file or or set of files to clean up the edges after each cut
- To clean up any chips or dings in your shelving before installation:
- You may need wood filler for any defects that have broken the surface of the shelf
- Touch-up markers particular to the finish of your wood
- OR
- In my case, I had pretty good results touching up my white melamine with white semi-gloss paint
- Hand-held screwdrivers or a screw gun to screw the channel to the shelves
Installing the LED light strip
- Refer to my guide on cutting and extending LED light strips if you want to run wiring between sections of LED strip light (and the tools you’ll need to do so)
- You may need a glue gun if any sections of your LED strip don’t want to adhere
Route the shelving
So, after acquiring the tools and materials you’ll need, it’s time to route out your shelving to make space for your LED channel.
When setting out to upgrade your shelves with built-in LED lighting, the first thing you’ll need to do is determine how far back into your shelving you want to place the LED channel (and thus the light source below your shelf). In my case, I knew that I would be using “cord cover” to hide the wiring between shelves. The vertical members of my kit had a row of pre-drilled holes near the front of the shelf, and so I wanted the wire concealer elements to be placed behind the pre-drilled holes.
With those factors considered, I gave myself a couple of inches behind the pre-drilled holes and positioned everything where the cord cover could terminate directly below the LED channel:

Basically, I wanted to determine what my measurements needed to be from the front of each shelf. This way, I could set up my clamp & cut guide the same way on every shelf as I routed out a space for the LED channel.
As it turns out, for all of my straight shelving (all of my shelving other than my corner shelves), I simply lined my clamp-and-cut guide up even with the front of the shelf, then went to town. The width of the guide plus the distance between the edge and center of my router was right around where I had decided I wanted my LED light strips to ultimately end up.
Get ready to route your shelves
So, time to get everything setup. Outside your home, in your garage, or wherever you’ll be working, go ahead and setup your saw horses, router table, or work bench.

Once you have everything setup, follow the instructions on your router for installing the bit and setting up its depth adjustment. Don any safety gear appropriate to the task, and of course, be careful. If you don’t feel comfortable handling rotary tools of this type, ask for help or hire a professional.
Measure and set your fence
To route a nice, straight dado (groove for your LED channel) into your wood, you’ll need a fence or table to serve as a guide for your router.
Using one of the options above, and using your measurement for how far back from the face of the shelf you’d like to place your LED channel, position the fence or guide to ensure your router will be cutting the channel in the right place.
In my case, my desired positioning allowed me to simply clamp my guide even with the face of each shelf. With around 30 shelves to route, that sure cut down on my setup time for each piece. 🙂

Set your router bit depth
Next, you’ll set the depth of your router bit below the bottom surface of the router. Once again, you’ll need to refer to the dimensions of your LED channel for the depth of the channel below the flange.
In my case, with the height of my LED channel below its flange, I wanted a groove that was around 5/16″ deep.
It would be nice if you could just set your router bit to the desired depth of your groove, and make the cut in one stroke. Now, perhaps with different shelving material or with higher-quality routing equipment, this would be possible. I found, however, that I could not set my bit very deep without burning the wood.
I found that my routing process went somewhat smoothly (although not perfectly) if I made 3 passes with the router, setting the bit deeper on each pass until the 3rd pass was at my desired depth of ~5/16″. On my first pass, my bit needed to protrude only about 1/8″ past the bottom of my router:

Route out the groove for your LED channel
Ok, time to make some sawdust. Starting with the router off of the edge of the material, I move a little slowly as I first get the router cutting into the side of the board.
Using my inexpensive trim router and clamp-and-cut edge guide, I found that I had to press the router firmly downwards while maintaining moderate pressure towards the guide. This kept the bit from skipping out of the groove (particularly on the first pass, the router wanted to skip out on the slick melamine), and kept the channel as straight as possible in reference to my guide.
If I moved too quickly, I would skip the router out of the groove on the slick melamine surface, particularly on the first pass. If I moved too slowly, the router bit would burn the wood. So, I found that I needed to maintain a moderate, steady tempo as I maintained pressure down and towards the fence and passed the router from one end of the material to the other. You can see the increasing depth of each pass below:


I was able to get the grooves or dadoes themselves to come out pretty nicely square and somewhat clean. Unfortunately, I did have a lot of chipping at the melamine surface adjacent to each groove. The good news is that the flange on the LED channel concealed most of the chipping.
Cut the LED channel
Nice – you’ve routed some dadoes into your shelving and now you’re ready to install the LED channel. I don’t think you’ll be disappointed.
Prep your LED channel
The first thing you’ll need to do is go ahead and prep your LED channel. This should be pretty straightforward. If your kit comes in as mine did, you’ll have a bundle of aluminum channel segments and a bundle of opal diffusers.

Go ahead and snap the diffuser into the LED channel. The reason I like to put the two pieces together is so that when I cut the channel to fit the shelf, I only have to make one cut and the diffuser will be exactly the same length as the channel.
Line one side of the diffuser up near one end of the channel. Press down firmly to get the diffuser to start to snap in place. You shouldn’t have to press down with a ton of force. It does take some effort, but if you’re having to push very hard, it’s not lined up right.
Snap in about an inch or two of diffuser, then make sure the end of the diffuser is lined up very neatly with the end of the LED channel. If not, you can push or pull the diffuser to move it around in the channel.
Just snaaaaap it in
Work your way down the diffuser towards the opposite end of the channel, sliding your thumbs down to seat the diffuser as you go. After you’ve snapped in another 6 inches or so of diffuser, check that the ends are lined up again. At this point, it may have drifted a bit as you’ve worked the diffuser into the channel. If necessary, push or pull on the diffuser again to line its end up with the end of the channel.
Once you get past this point (maybe 6-12″ of diffuser snapped in), the diffuser ends usually won’t drift any more. Work your way to the opposite end of the channel until the diffuser is fully engaged.
The diffuser that came with my LED channel had a thin plastic film on it that you are supposed to peel off after installation. Leave the film on for now to protect the diffuser as you work on the piece.
Mark the channel for your cut
Set your shelf down and place the LED channel in the groove you routed into the shelf. Line one end of the channel up very nicely with the end of your shelf. Be careful that the channel does not protrude past the end of the shelf. If it does, it might scratch the wall or other surface when you go to install the shelf.

With the channel and shelf lined up on one end, make a couple of marks on the opposite site of the channel with a pencil or marker. If you have in mind which way you’ll be placing the piece under the saw, you really only need one mark.
I like to make the edge of the mark as even as possible with the edge of the material. Doing it this way, when I bring the saw blade down, I make the edge of the saw blade “erase” the mark completely, and I know my cut will be just right.

Alternatively, you could measure the shelf, then transfer that measurement to the LED channel to make your mark. At some point in my career, I became a big fan of physically placing things in their eventual home and then scribing them in place. It takes away some of the potential for error that is present when you have to measure, or – worse still – calculate the position for a mark.
Cut your LED channel with a metal-cutting blade
With your channel marked up, go ahead and get your saw ready. I have a small Craftsman compound miter saw that was perfect for cutting LED channel. When I was ready to cut my first piece of LED channel, I positioned the saw and removed the wood-cutting blade that was in it. I installed a metal-cutting blade which worked very nicely for this job.
Whenever you’re using tools of this type, always make sure to wear safety glasses, ear protection, and any other gear that’s recommended by the manufacturer. No project is worth being injured or damaging one of your senses.
As I mentioned previously, I like to make the first LED channel cut with the opal diffuser installed in the channel. This actually saves some time overall as you will not typically have to cut the diffuser again, depending on how you route your wiring.

With your saw ready to go, set your piece on the saw’s table. If you’re making a straight cut, as you can see that I am, make sure that the saw’s bevel and miter are both set to 0°.
Hold or clamp the piece so that it is held firmly down towards the table and back against the fence. Bring the saw down until the edge of the saw is perfectly even with the edge of your mark, and your cut will be perfect. The metal-cutting bit should slice right through the aluminum channel, with just a bit of resistance.
Clean up your cut edge
Immediately upon picking the piece up from the saw, I like to clean up the cut edge. The majority of the time, the cut will leave behind a very sharp edge that often has some razor-sharp aluminum slivers hanging off the end. You don’t want this edge hanging out for you to accidentally try to pick up later.
Hold the freshly cut piece over a trash can with a file in your other hand. Roll the file over the sharp edges to soften the edges and clean up their appearance.

Do the same thing on all edges of the channel, including the front. Take care not to damage or scuff the face of the channel that will be visible once it’s installed.
The diffuser will also likely be a little ragged or even burnt where it was cut with the saw. With a few passes of the file, the diffuser should clean up nicely. Once you’ve cleaned up your edges, go ahead and pop the diffuser back out of the LED channel and set it aside.
If your shelving is of different lengths, label your diffuser and your shelf with a letter or number. I placed a small piece of masking tape on both my shelf and my diffuser with matching letters as I went. In other words, I would separate the diffuser, then label both the diffuser and the shelf “A”, “B”, etc.
Again, filing down the edges does serve the purpose of cleaning up the piece. More importantly, however, filing the metal removes the ultra-sharp edge that will often be present after the LED channel has been cut.
Install the LED channel
Prep the shelf
If you’re like me, then you’ll have some chips or dings to clean up before installing the LED channel. Apparently, melamine is a notoriously difficult material to cut or route without chipping.
I settled into a routine on this project and didn’t end up trying some potentially better methods, such as the advice in this guide on cutting melamine. Hopefully, you’ll do better than I did and end up chip-free…
Touch up any defects
… but, if you do have some chips or dings to clean up, here is where your wood filler and touch-up markers will come in handy.
I didn’t want to worry about any defects that were hidden by the flange of the LED channel. So, the first thing I did was to temporarily lay the channel in the groove on the shelf.
I then marked any chips that protruded past the channel’s flange (with a little piece of tape or whatever will help you remember). For any chips or dings of any depth, I used wood filler to level the defect with the surface of the melamine. Once the wood filler was dry, I wiped with a wet rag if necessary to clean and level the surface.
With my surface now flat and even, I used a tiny paint brush and some white semi-gloss paint to touch up any flaws. For the white melamine that I was working with, this method worked pretty well to conceal any imperfections. Whatever type of wood you’re using for your shelving, there is a litany of touch-up products available to match your finish.
Do your touch-up, let everything dry for the amount of time specified by the products you’re using, and then it’s time to install the channel!
Fasten the channel to the shelf
Finally! You’re ready to attach the channel to the shelf. There aren’t really any great surprises here, except that you need to be careful to size your screws properly (as described above). If your screws are too long, you’ll punch through the other side of your shelf!
As I mentioned above, my LED channel kit came with little clips for attaching the channel to the shelf. I installed these clips in the first couple of shelves, then decided that I wasn’t very happy with them.
So, I ended up sizing up and purchasing sheet metal screws with slim heads that would work well for this application.
Attach the channel to the shelf
Again, nothing too mysterious, here:
- Position the LED channel in the groove
- If you’re using a screw gun, set it to its lowest torque value; increase if necessary
- Place one of the screws a couple inches or so from one end of the shelf
- Fasten the screw through the channel and into the wood, using only as much torque as is needed to hold the flange of the channel against the surface of the shelf

After installing the first screw, press the LED channel down, moving away from the screw towards the opposite end of the shelf. This will help to flatten any slight difference in curvature between the LED channel and the shelf.
Install a second screw on the opposite side of the shelf. The channel should now be fastened firmly to the shelf. The flange should be tight to the shelf on both sides.
Depending on the length of your shelf, it may be necessary to install one or more additional screws. Do so until there are no gaps present over the full length of the channel. You should now be looking at a shelf that looks like it came from the factory with a built-in LED channel.
Install the LED strip lights
So, you’ve done all the hard work now of routing the wood, cutting the LED channel, and installing the LED channel. We’re on the home stretch. It’s time to shed a little light on the situation.
Plan your wiring route
The first thing to consider is how you’ll get the wiring into the LED channel. Most likely, you’ll come from underneath the channel. The guide below is written as though this is the case.
The best case scenario is if the electrical outlet is located underneath the shelf. If this is the case, you can either conceal the wiring underneath the shelf, or use a wire concealment system to hide the cords.
Let me put it one other way. The first decision to make is whether or not you need to remove a little bit of material from the end of the diffuser. You would do this so that the wiring can be passed discretely into the LED channel from underneath.
Trim the diffuser
If you’re going to pass the wiring into the LED channel from underneath, nip about 1/8″ off of the end of the diffuser with your metal-cutting saw. If necessary, clean up the cut edge with your file.
Cut the light strip to size
Chances are, the next step will be to cut the LED strip to the size of your shelf. This will give you that custom look and fit that you were hoping for when you started this project.
The LED light strips I chose for this project were trimmable after every third LED. There are kits out there that permit you to cut after every single LED. For my project, every third worked just fine, and worked perfectly for the majority of my shelves.
Simply roll out a length of LED strip light across the width of the shelf. Hold one end of the strip against one side of the shelf. Pull the other end taut against the other side, and grab the nearest cut line that will give you a length of LED light strip just shorter than the width of the shelf.
On the prescribed cut line, cut your LED strip using a pair of scissors or wire cutters. Regardless of how well-centered the cut line is, do your best to cut the copper pads precisely in half.
Stick the LED light strip inside of the channel
One thing to consider at this point is whether you want to mount your shelf now or wait until you’ve adhered your LED strip light. If you’re only doing one or a few shelves, it may be easier to apply the LED strip where you can easily access the shelf. If you’re doing many shelves, however, and you need to cut your wire to specific lengths between shelves, it may be beneficial to mount your shelving first.
Make sure to test your light strip first
With all of the preliminary work out of the way, it’s time to install your LED light strip. Before installing your strip light, you should definitely test it out.
To test your light strip, just plug it in real quick with it still wrapped up on the reel. If you’re soldering in new wire to power your LED light strip, make sure to test it after making your solder joints. If the strip light illuminates, you’re clear to proceed.
A couple notes if you’re soldering in new wiring:
- You can typically take power in at one end of an LED light strip and send power out of the other end to supply the next LED strip segment. If I need to wire in one side and out the other, I like to solder in both the incoming and outgoing wiring before securing my LED light strip inside of the LED channel.
- Make sure that you use electrical tape or heat shrink to insulate your new connections. If not, they may short out within the LED channel.
Stick the LED light strip down in the channel
This part is pretty straightforward. There’s one key thing to keep in mind as you adhere your LED strip: Do your best to keep the strip centered between the walls of the LED channel. If your strip zigs and zags down the channel, it may be noticeable through the diffuser. Here’s the process for installing LED light strip within LED channel:
- Center your cut segment of light strip from one end of the LED channel to the other. You want the last lights on each end to be the same distance from the end of the channel
- Start at the opposite end from your wiring connection (or on either end if you have wiring on both ends)
- Peel off an inch or so of the paper backing from the sticky back of the light strip
- Center the LED strip light within the walls of the LED channel, and press down to adhere the strip to the channel

You can see a bit of a bump in the light strip (right next to the first LED) where the head of the first screw is located. This won’t affect the appearance of your light strip once the diffuser’s in place.
Continue adhering the LED light strip
- Peel off another 3-6″ of backing
- Gently pull the furthest point of exposed sticky away from the section of strip that’s already secured and center it within the channel
- Working away from the part that’s already secure, press down on the LED strip to adhere it within the channel
- If you run across a section that won’t stick to the channel, use a glue gun to secure that portion of the LED light strip
- Continue working this way until you’ve adhered the entire strip
Install the diffuser
Lastly, it’s time to put the diffuser in place. The diffuser will hide the LED light strip and distribute the light evenly.
As you did before, begin by snapping one end of the diffuser into the LED channel. If you trimmed a little material off of one end of the diffuser to pass in your wiring, I usually like to start with that end. After you’ve snapped in ~2″ of diffuser, make sure your wiring is tucked into the very end of your LED channel, then push the end of the diffuser towards the end of the shelf until it almost touches the wiring.
Continue to follow the same procedure you did earlier. Push the diffuser into the channel. After you have ~6-12″ of diffuser snapped in, check that the end is still where you want it, almost against the wiring at the end of the channel (or even with the end if you don’t have any wiring coming in from below the channel).
Do a quick check before closing everything out
I like to check at this point that everything is still working. Plug in or turn on your LED light strip and make sure it’s good. When you’re confident everything is ready, continue to snap in the rest of the diffuser until the entire piece is in place.
This time, once you have the diffuser in place, you can go ahead and peel off the thin plastic film. Nice! Just a few more steps and your custom LED lighting will be fully installed.
Mount the shelving & conceal the wiring
Now that you’ve installed, wired, and enclosed your LED light strip within your built-in LED channel, it’s time to wrap everything up.
Mount your shelving
If you’re putting up new shelving, or if you took down your shelving and installed the LED light strips with the shelving off of the wall, now’s the time to put everything back in place.
When mounting your shelves, be careful with the wiring as you work. You want to avoid breaking a solder joint or damaging the wire.
Conceal your wiring
With everything back in place, you’re ready for the finishing touches. Maybe I’m a bit obsessive-compulsive, but I like to turn everything on one last time to make sure I didn’t damage any wiring or connections when I mounted the shelving.
Prepare your wire cover
Having performed one last “ops check” of your LED lighting, let’s clean up that final detail by installing the wire cover.
If you purchased the same wire cover that I used, you’ll find that it’s pretty simple to install. I like to hold my wire cover in place and then scribe a mark where I want to make my cut. If you are passing your wire into your LED channel from underneath, scribe the mark ~ 1/8″ under the bottom of the shelf to accommodate the diffuser:


Use your saw and metal-cutting blade to buzz right through the cord concealer on your scribe mark.
Slide the cover off of the “wire tray” and set it aside. If you won’t be installing the cord concealer immediately, you may want to label the cover and “tray” with a piece of tape and the same letter or number to make it easy on yourself later.
Install your wire cover
When you’re ready to install the wire tray, it’s helpful if you have any slack that you can gently pull away from the surface where you’ll be mounting the cord concealer.

At the top, the wire cover will conceal the wire insertion point and the end of the diffuser.
When you’re ready, pull the paper off of the back of the cord cover. Once the sticky pad underneath is exposed, it will stick very strongly to whatever it touches. This is something you have to get right on the first try.
I typically found it easiest to start at the bottom. Tilting the segment of cord concealer away from the application site, I first position the very bottom corner where I want it on the top of the shelf below.

Careful! Careful!
Once that corner is positioned properly, I start tilting the sticky pad towards the vertical surface, making sure that the top of the cord cover is aligned with the diffuser on the shelf above.
Once the cord cover’s sticky pad is in complete contact with the vertical surface, press it down to adhere it fully.
Nice! Your cord concealer tray is in place. Now, tuck your wiring neatly into your tray. If you have any slack, gently bend the wiring to tuck it into the tray.

So close! Snap on the cover, starting at one end and working towards the other. Cord concealer is an attractive, yet inexpensive finishing touch that will give your job a professional look.

And that’s it! You’ve successfully upgraded your shelves with built-in LED light strips. You’re housing your light strips in attractive LED channel, and concealing the wiring with cord cover. I bet it looks awesome! Please feel free to share the details of your project with me in the comment section below.
Additional resources
Awesome! I hope you’ve made it to this part of the page because you’ve taken on your own custom LED lighting project, or you’re seriously considering doing so. I promise, it’s a lot of fun and can add a dramatic effect to the closet, cabinet, or other shelving in your home.
First, if this project was your kind of thing, then let’s stay in touch! My newsletter will bring you more content like this, only a few times per month at most:
There are a lot of options out there and a lot of things to consider when purchasing LED lighting and related equipment. Here are some resources that I hope will be helpful for you:
LED lighting resources
- How to extend LED light strips by cutting and soldering
- InStyleLED’s guide on using solderless connectors
- Instructables’ intro to LED strips
- 1000bulbs’ profile guide for LED channel
- Battery-powered LED lighting options
I’m always hoping to learn and improve, and love to hear from my visitors, so please feel free to provide any feedback in the comments below. Thanks for reading!