Want to integrate 2 light switches with your home automation setup? One way to do this is to replace both light switches with smart switches. Smart switches can be pricey, however, and so there’s another means of converting two light switches in an electrical box into smart switches.
Just as a smart relay can help you convert a single light switch into a smart switch, a dual smart relay does the same with two output circuits. In other words, a dual smart relay like the Shelly 2.5 can control and monitor two separate lights or other switched devices that share an electrical box. Once set up on the Shelly app, you will then be able to control your lights or other electrical circuits using Alexa or another voice assistant.
Contents
- Your Home “User Experience”
- How To Install The Shelly 2.5 Dual Smart Relay To Automate Two Light Switches
- How To Setup The Shelly 2.5 On Your Network
- Where To Get Shelly Devices
- Additional Information
Your Home “User Experience”
One thing I really love about the Shelly 2.5 is that it helps you to maintain the “default” functionality of the light switches in your home. Here’s what I mean by that:
- You’ve lived in your house for a while
- When you walk in a room, you flip a light switch to turn the lights on
- The lights turn on
- Maybe you want to turn the lights off, so you flip the light switch again
- The lights turn off
With some smart home devices, including some smart plugs and smart lights, the device becomes an additional switch in series with the light switch. With devices of this type, you have to turn on the light switch and turn on the device.
Additionally, if someone turns the light switch off that powers the device, you won’t be able to turn the device on at all. These factors can render the “user experience” within your home somewhat unintuitive, and can lead to less-than-ideal behaviors like taping off light switches.
How Is The Shelly 2.5 Different?

With a Shelly 2.5, you won’t have the problem described above. The Shelly 2.5 has ports to accept inputs from your existing light switches. With this feature, Shelly 2.5 is able to seamlessly control the lights in your smart home either through your home automation or through the existing light switches. You’ll be able to automate two light switches without breaking the existing functionality.
About the size of a small box of matches, the Shelly 2.5 is designed to wire in with your existing switches and tuck into the back of your electrical box. I’ll go over the process below, including the step you’ll take to ensure your physical switches will still work normally. The entire process should take 1-2 hours.

How To Install The Shelly 2.5 Dual Smart Relay To Automate Two Light Switches
This process is not too bad, but will require a few basic electrical skills. If you have ever replaced a switch or outlet in your home, you should have all the knowledge necessary to install a Shelly 2.5. If you’re not comfortable or experienced with electrical work, get someone to help you or pay a professional to do the job. Additionally, be sure to check with your local building permit office to ensure you’ll be compliant with local electrical codes.
As mentioned above, automating two light switches with the Shelly 2.5 requires only basic electrical skills, and should take around an hour or two. Here is an overview of the steps (written for US residential wiring) you will take to install the Shelly 2.5 smart relay:
- Prep some wire jumpers
- Kill power to the lights you want to automate
- Pull out the switches & disconnect the outputs to the lights from each switch
- Connect the output wires to the Shelly
- Connect the power supply to the Shelly
- Wire the existing light switch outputs to the Shelly
- Connect a neutral wire to the Shelly
- Pack everything back in the electrical box
1. Prep Some Wire Jumpers
To make the electrical connections for your new Shelly smart home device, you’ll need some short “jumper” wires. You’ll need to bring in the following new connections:
| Connection | Quantity | Color |
|---|---|---|
| Power To Shelly | 2 | Black |
| Switch Output | 2 | Black |
| Neutral Wire | 1 | White |
In other words, at a minimum, you’ll need 4 short black jumper wires, and 1 short white jumper wire. By “short”, I mean around 3-4 inches, depending on the wiring in your electrical box.

Don’t Overload Your Wire Nuts
In addition to the minimum number of jumpers above, you may need additional jumpers if there are already several wires bundled in the existing wire nuts in your electrical box.
If I see 3 wires in a wire nut, I like to replace one from that bundle with a short jumper (because I know I’m about to add two more wires). I then use the short jumper to start a new wire nut bundle with: the other end of the jumper, the wire from the original bundle that I “replaced” with the jumper, and the new wiring I need to bring in.
Of course, the new wire nut needs to be rated to handle the quantity and gauge of wire in the new bundle (4 x 14AWG, in this example).
So, when we pull everything out of the electrical box in a moment, we’ll take a look at your existing bundles. If your wire nuts are already pretty crowded, you may need an additional black and/or white jumper wire to avoid overloading your wire nuts.
To prep your wire jumpers:
- First, cut 3-4″ lengths of wire from some 14/2 (or other wiring as appropriate for your application)
- Strip ~1/4″ from one end of each wire
- The Shelly 2.5’s ports are only ~1/4″ deep, so this end will go in the Shelly
- Strip ~1/2″ from the other end of each wire
- This end will be used to make your new wire nut and switch connections
- Once you get your switches out of the wall box, you can use the strip gauges for those two jumpers
2. Kill Power To The Two Lights You Want To Automate
After prepping your jumpers, the next step in the process of automating two light switches is to make the circuits safe to work on. To do this, I like to follow this process:
- Turn on both of the lights that you want to work on
- Go to your breaker box and kill the breaker for that area of the house
- Validate that both lights turned off. If not, you’ll need to find and shut off the breaker for the other circuit
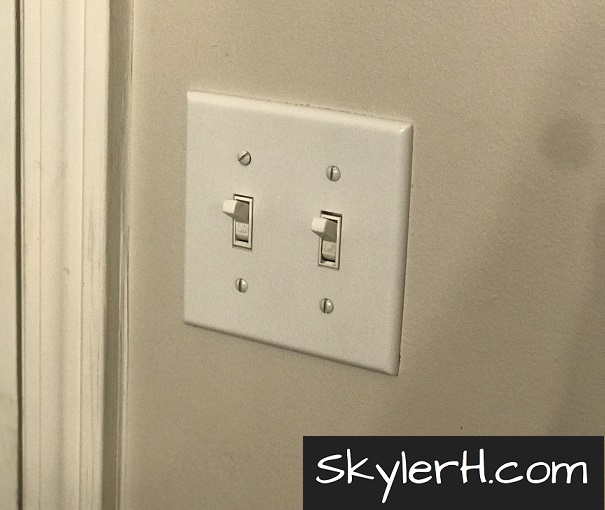
- Remove the wall plate

- “Test before you touch”
- Protect yourself; use a non-contact tester to make certain that there is no live wiring inside of the electrical box
As I mentioned previously, don’t take on any electrical tasks that you’re not comfortable with; there’s plenty of power in the wall to kill or seriously injure you. If you’re not feeling up to the task, get someone who knows what they’re doing to help you out, or pay an electrician to do the work for you.
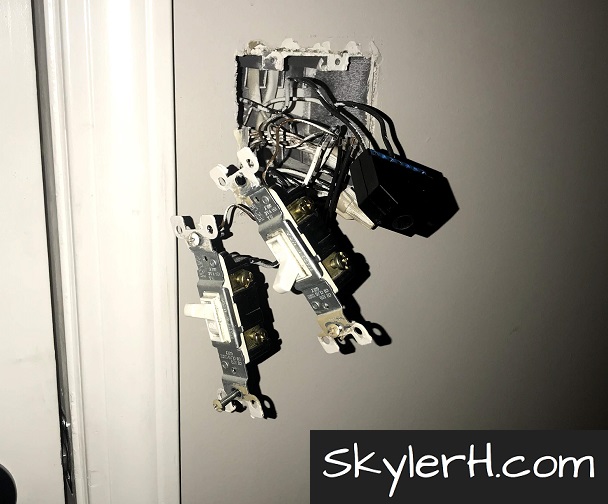
3. Pull Out The Switches & Disconnect The Outputs To The Lights From Each Switch
With the circuits safe and the wall plate pulled off, go ahead and unscrew the switches from the electrical box.
Pull the switches out from the box, then figure out which wires on the back of the switches are the output wires. By output wires, I mean the black wires that go out to the lights that the switches operate – not the black wires that come in from the supply.

If you’re having trouble telling which black wires are which, the supply wires likely come into the switch from the same wire nut, whereas the output wires will each run off individually to different cables that then leave the electrical box.
Once you’ve identified the output wires, disconnect those wires from the backs of the switches. Disconnecting these wires might mean unscrewing the terminal screw on the side of the switch, or depressing a mechanical release on the back of the switch for push-in connections. Depending on the design of the push-in switch, you may have to cut the wire behind the switch and strip off some insulation to get it ready for the next step.

Keep track of which wire went to which switch so that you can make sure your switches will still control the same lights after you install the dual smart relay. In other words, if you lose track of which wire is which, the switches may end up working opposite from what you’re used to.
4. Connect The Output Wires To The Shelly
Alrighty, time to start wiring in the Shelly 2.5 to automate two light switches with just 1 device!
Keeping track of which output wire went to which switch, take hold of one of the output wires. The Shelly 2.5’s ports are only ~1/4″ deep, so trim the end of the output wire down to about that length.
Insert the exposed wire into the closest Shelly 2.5 output port (either O1 or O2). While holding the wire in place, use a small flat-tip screwdriver to tighten down the screw for that port.
Pull on the wire to make sure it’s securely engaged in the Shelly output port.
Repeat this process for the second output wire. Recall which output wire went to which Shelly output port (O1 or O2). You’ll want to make sure you connect the switch output to the corresponding SW terminal in a future step.
5. Connect The Power Supply To The Shelly
The Shelly 2.5 is a powered device and requires a power supply for each output circuit. In this step, we’ll connect electrical power to the Shelly’s L (for “Line”) ports:
- Find the wire nut in the electrical box where all of the black wires are bundled together
- Unscrew the wire nut
- If there were 3 or more wires bundled together, remove one of the wires from the bundle and add a short black jumper wire
- Hold the original wires together (minus the one you removed, plus the short jumper) and reinstall their wire nut
- Pull on each wire to make sure it’s secure in the wire nut
- If there were 3 or more wires bundled together, remove one of the wires from the bundle and add a short black jumper wire
- Add two black jumper wires to the bundle (or to your jumper, along with the other black wire you “replaced” from the original bundle)
- Hold the black wires together and install a wire nut

- Pull on each wire to make sure that it is secure in the wire nut
- Connect the other ends of the black jumper wires to the “L” terminals on the Shelly 2.5

- After tightening the screws for those terminals, pull on each of these jumpers to make sure they’re secure in the Shelly
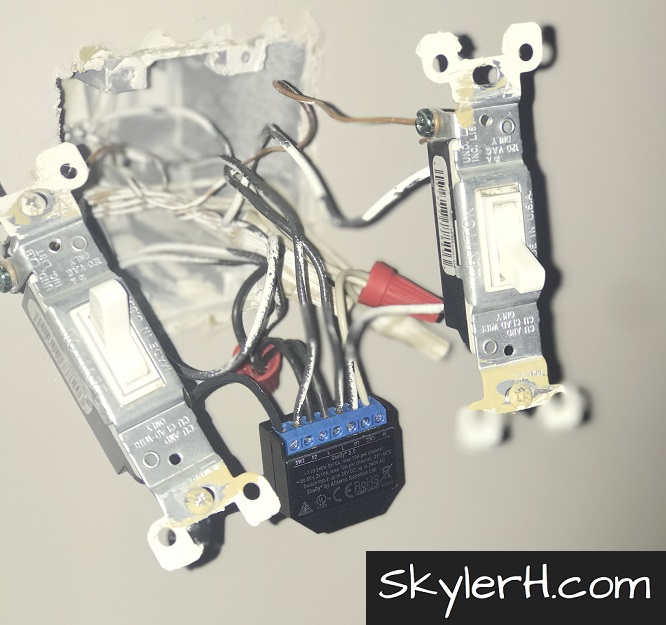
6. Wire The Existing Light Switch Outputs To The Shelly
The next step is to integrate the Shelly with the existing light switches. By watching the output from those switches, the Shelly is able to maintain the existing functionality that you expect when you flip a light switch. In addition to enabling control from anywhere in the world via the Shelly app, or voice control through Amazon Alexa or another voice assistant, you’re left with the functionality that you’re used to: you can still flip the physical light switch, and the light turns on or off.
Magic! Let’s get those switches wired in:
- If there is a strip gauge on the back of your switch, use the gauge to make sure you’ve stripped the right amount of insulation off of your black jumper wire
- Connect a black jumper wire to your switch, either by inserting it into a push-in terminal, or curling it around the screw terminal and tightening the screw

Connect The Switch Output Jumpers To The Shelly
- Insert the other end of the jumper wire into the Shelly 2.5 SW1 or SW2 port that corresponds with the O1 or O2 port
- In other words, if, in Step 4, you connected the light output wire that you disconnected from the switch on the left to Shelly’s O2, then now connect the switch output jumper from the switch on the left to Shelly’s SW2

Make sure that the switch jumper connects to the same # SW port as the output to the light that was once connected to that switch.
In other words, if the supply for the light that used to be connected to the light switch on the left is now hooked up to O2, make sure that the switch output jumper from that light is now hooked up to SW2.
- Pull on the wire to make sure it’s securely engaged in the Shelly port
- Repeat this process for the other switch
7. Connect A Neutral Wire To The Shelly
Almost there! Next, let’s connect the neutral wire to the Shelly’s N terminal:
- Find the wire nut where all of the white wires are bundled together
- Unscrew the wire nut
- If there were 3 or more wires bundled together, remove one of the wires from the bundle and add a short white jumper wire
- Hold the original wires together (minus the one you removed, plus the short jumper) and reinstall their wire nut
- Pull on each wire to make sure it’s secure in the wire nut
- If there were 3 or more wires bundled together, remove one of the wires from the bundle and add a short white jumper wire
- Add a white jumper wire to the bundle (or to your jumper, along with the other white wire you “replaced” from the original bundle)
- Hold the white wires together and install a wire nut

- Pull on each wire to make sure that it is secure in the wire nut
- Connect the other ends of the white jumper wire to the “N” terminal on the Shelly 2.5
- After tightening the screw for that terminal, pull on the white jumper to make sure it’s secure in the Shelly
8. Pack Everything Back In The Electrical Box
Alright; we’re on the home stretch. Just need to put everything back together then set your new Shelly device up in the Shelly app.
Carefully tuck your wiring back into the electrical box, taking care not to stress the wiring unnecessarily. Once everything’s tucked in, screw your light switches back into place and then reinstall your wall plate.
After physically reinstalling your wiring, make sure everything’s working. Turn the breaker(s) back on that you disabled previously. The light switches should work normally at this point to turn the lights on and off.
How To Setup The Shelly 2.5 On Your Network
Nice! You’ve physically installed your new Shelly 2.5 dual smart relay, and are ready to automate two separate electrical circuits with one device using your smart home controller. Now, it’s time to set Shelly up on your network. First, you’ll setup the Shelly app and add your new device. Then, you’ll integrate Shelly with your Amazon Echo or other voice control products.
Setup The Shelly App On Your Mobile Device
The Shelly app will allow you to control your new Shelly device via your phone or tablet. Once connected, you’ll have the option to control your devices solely over your home network, or from anywhere in the world by connecting your device with Shelly Cloud.
To install the app, follow one of the links below, or scan the QR code on the side of the box that your Shelly device arrived in:
- Android: https://play.google.com/store/apps/details?id=allterco.bg.shelly&hl=en_US
- iPhone: https://apps.apple.com/us/app/shelly-cloud/id1147141552

Follow the instructions within the app to create an account and get ready to add your new dual smart relay.

If you have any issues, click the following link to seek help in Shelly’s support group on Facebook.
Add Your New Device Within The Shelly App
Once you have the Shelly app and your account setup, it’s time to add your new smart relay.
- Make sure the Shelly 2.5 itself is powered up. If you can see the device inside of the electrical box, there should be a red light blinking
- On your mobile device’s WiFi settings, connect to the Shelly’s web server. It should show up in your list of WiFi networks as something like
shelly-switch25-35FA58

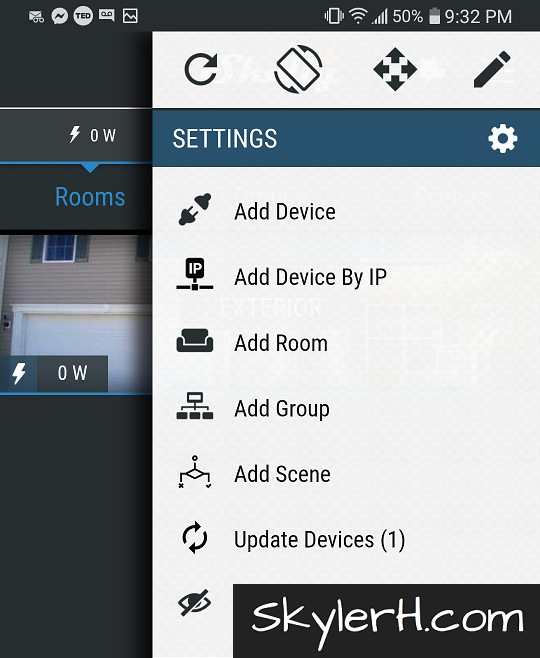
- Once connected to the Shelly’s WiFi network, return to the Shelly app. Click the menu icon and click Add Device
- On the next screen, select your home WiFi network from the dropdown, then enter your password. Make sure to use your 2.4GHz network, not your 5GHz network

- Next, you should see the new device you’re trying to add on the “Include Devices” screen

- Check the box next to your new device (or click Select All), then click Include Devices

- The Shelly app will then connect to your new Shelly 2.5 and set it up to work on your WiFi network

- Success! Now that your new Shelly device is connected to your WiFi network, you can set it up how you like within the app. If you don’t have any Rooms defined within the app, setup a Room for your new device (Kitchen, Living Room, etc.). Once you have a Room ready, click Discovered Devices to setup your new device

Give Your New Shelly 2.5 A Name & Add It To A Room
- Within Discovered Devices, click the Click To Add button to add your new device to a Room and choose its “Picture” (icon within the Shelly app)

- On the Add Device screen:
- Give the device a name. Because the Shelly 2.5 is a dual smart relay, when you add a Shelly 2.5, you’re adding two devices at once. So, just give the device the name for either circuit (“Back Porch Light”, “Kitchen Light”, etc.). You’ll straighten this out for the other device in a minute
- Choose the Room where you want the new device
- Choose the icon (“Picture”) you would like the device to have within the Shelly app. If I’m adding a light switch, I always like to use the light bulb Picture
- When you’re ready, click Save Device

- Shelly will ask if you want to connect the device to the Shelly Cloud. Shelly devices have the option for local-only control (you can control your devices only when you’re connected to your home WiFi network) or control via Shelly Cloud (you can control your devices from anywhere in the world). Whichever option you want, I found that installation went smoother if I clicked No here. I then update the device firmware before connecting to Shelly Cloud in a later step

- Because the Shelly 2.5 is a dual smart relay, it will show up in the Shelly app as two devices: one for each circuit that it’s able to control. Click the power icon next to each device to figure out which is which. Go ahead and straighten up the names for both devices as appropriate for the circuits that they control

Update The Firmware On Your New Shelly 2.5
- Like most electronics these days, Shelly is kept current by its manufacturer through firmware updates. Click on your new device (in the Shelly app, click the Room it’s in, then click the device name), then click the firmware update notice. You may have to restart the Shelly app to see the firmware notice, but most likely you will need to update the firmware on a new device

- Click Update to confirm the update. Give Shelly a few minutes to perform the update and then the device will restart itself

Set Shelly’s Button Type So Your Switches Work Normally
If you’ll recall from the beginning of this post, one of the features I strive for in my own home automation is to keep the “user experience” intuitive. When I walk over to a light switch and flip the switch, I want it to turn the lights on if they’re off and turn the lights off if they’re on. That seems pretty straightforward, but if you’ve installed a few smart home devices, you’ve probably seen by now that it’s not always so clear-cut.
Next, we’ll set Shelly’s Button Type to make sure that when we flip a switch that’s connected to the Shelly, the lights behave as we expect them to.
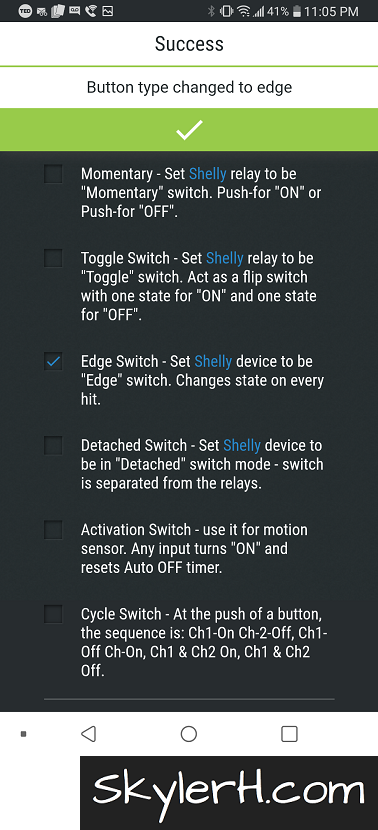
- From the device’s screen in the Shelly app (shown above), click Settings, then click Button Type

- On the Button Type screen, click Edge Switch. This will set Shelly to change its output state (turn the light on or off) every time it receives an input from the light switch (every time someone throws the switch either up or down)
- This allows you to control your lighting either via your smart home controllers and voice assistants, or through the light switches. Everything will work as you expect it to
- The only “drawback” to this is that your lights may be on when your physical light switch is in the off position, but this is unavoidable unless you upgrade the switches to smart switches
- Repeat this for your other new device
Setup Your New Devices For Control Via Shelly Cloud
Some folks like the security of local-only control, and can skip the following steps. If you’d like to be able to control the device from anywhere in the world via the Shelly app (and through Amazon Echo or Google Home products or other smart home control), you’ll want to setup your new device for the Shelly Cloud.
- In the Shelly app, click on the device you want to connect
- Click Internet/Security
- Click Cloud

- With the Cloud section expanded, click Enable Cloud

- Click Associate To Cloud to tell Shelly you want to link your new device to the Shelly Cloud (enabling worldwide control via the app and control through Amazon Alexa or another voice assistant)
- Click Yes on the confirmation pop-up

- That’s that! You’re now able to control your lights from anywhere in the world using the Shelly app

Link Shelly w/ Amazon Alexa To Allow Voice Control
If you want to be able to control your lights through Amazon Alexa (or another voice assistant), the last step in the process is to link the Shelly app with Alexa. This process is somewhat straightforward:
- Add the Shelly Cloud skill to Alexa
- Follow the instructions within the skill to enable it. You’ll need to enter your login and password from the Shelly app
- Enjoy the time-savings and home automation features you’ve just unlocked by linking Shelly with a voice controller!
Where To Get Shelly Devices
Two great places to pick up Shelly gear are on Amazon and on Shelly’s USA store. You can use the Amazon links below to support this blog (at no additional cost to you), but don’t be shy about checking out Shelly’s online store, where they often run great sales and combo deals on their products.
Here are some great Shelly products you can purchase through Amazon:
- The Shelly 2.5 (can control 2 electrical circuits):
- A two-pack of the Shelly 1’s (each device can control 1 circuit):
- The Shelly dimmer, which lets you control and dim a dimmable light source:
Additionally, don’t forget to check out the Shelly Shop USA for limited-time deals.
Additional Information
First things first – if this article was your cup of tea, please take a moment to subscribe to my email list. I’d love to keep you up-to-date whenever I post new home automation or industrial automation content. Best of all, I’m not at all spammy (around 0-2 emails a month).
Secondly, if you’re looking for more information on Shelly products, check out some of the following resources:
- How to convert a single light switch into a smart switch using a Shelly 1
- The Shelly support group on Facebook
- Smarter Home Club – an awesome Facebook community dedicated to all things smart home and home automation
Thanks for reading! Questions? Have something to say about Shelly or other smart home devices? Please feel welcome to reach out to the community in the comments section below.