If you’re a PLC programmer, you can surely think of someone on your team who is just fast. He or she knows all of the keyboard shortcuts, menus, and tricks. They’re like the Mozart of ladder logic, hammering away at the keyboard, with new instructions flying onto the screen faster than you can follow. Part of this level of mastery comes from knowing your organization’s ladder logic template, but part of it comes from knowing Rockwell Automation’s software and its tricks, keyboard shortcuts, and techniques. Use these 11 tips to level up your RSLogix 5000 game and become a faster PLC programmer!
These are some tips and tricks that I’ve learned along the way, and that have really helped me to become faster at programming and debugging ladder logic in RSLogix 5000. I hope these will help you, too – and if so, pass them on! You can help my blog grow by sharing this post on social media using the buttons at the bottom of this page. Thanks in advance for reading – here are the tips!
- Stop Using The Language Element Box
- Become A Master Branch Manipulator
- Use Ctrl+G For “GO RIGHT TO IT”
- Use The Keyboard To Move Around In RSLogix 5000
- Understand The Slider Bar On The Right Of The Screen
- Always Check To Make Sure You’re Online
- Quickly Duplicate Logic Offline Using Find And Replace
- Stay On The Monitor Tags Tab
- Understand All 3 Sections Of Typical Instructions
- End Description Editing Just By Clicking
- Look For Drop Points When Clicking And Dragging
Tip #1: Stop Using The Language Element Box

The first of my RSLogix 5000 tips for you is: if you’re using the Language Element box to add most of your new instructions, just stop! Well, not completely. The Favorites tab (shown above) is ok. It’s pretty convenient to be able to drag in new rungs, branches, and maybe branch levels or the other common instructions (XIC, OTE, etc.).
Beyond that, though: just stop it! You need a MOV, ONS, TOF? Do you know which tab you’ll find them under? Some are obvious, like Timer/Counter instructions. How about CPS? JSR? Maybe you’re old hat from RSLogix 5 and you remember where each instruction lives among the various tabs. You still have to click over to the correct tab and drag down the element you want. So, if you want to hammer in new logic fast, cut it out!
A better way
Instead, when you want to add a new instruction, do this:
- Left-click in the ladder editor to highlight an instruction, rung, branch, etc. The new instruction or element you’re going to insert will go either to the right or below the highlighted element
- If you’re adding an instruction or branch, it will go to the right of the selected item
- If you’re adding a rung or branch level, it will go below the selected rung or branch level
- Press the Insert key on your keyboard
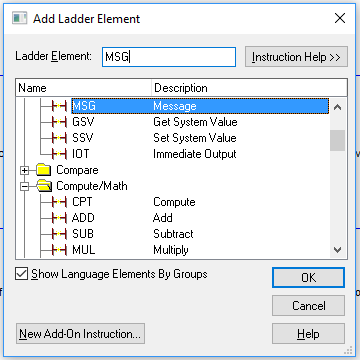
- The Add Ladder Element dialog will pop up
- Start typing the name of the instruction you want. If you want a MOV instruction, start typing “M”, “O”, “V”. RSLogix will auto-complete as you type
- When the ladder element that you’re looking for is highlighted, press Enter to insert the new instruction
I promise this will save you time. Yes, it’s fair to say that it’s still convenient and sometimes even faster to just click on some of the common instructions in the Favorites tab. Many times, though, and particularly when you’re building out a rung and you’re living on the keyboard, it’s much quicker to be able to insert a new instruction without having to go back to the mouse.
Tip #2: Become A Master Branch Manipulator
Branches are absolutely meat and potatoes components in RSLogix 5000. Aside from being critical for use as “OR” gates, branches can be used to improve the organization and readability of your logic.
With that said, branches and branch levels can be a bit tricky at first. Let’s try to unravel the mystery a bit. 🙂
Branches have different options available depending on which side of the branch you select. The left side of a branch allows you to manipulate individual branch levels, while the right side of a branch allows you to manipulate the entire branch.
The left side of a branch: branch levels
Selectable points on the left side of a branch allow you to manipulate individual branch levels. This is evidenced by the small box that is drawn around the particular intersection you select. To select an individual branch level, you click an intersection between a branch level and the left vertical element of the branch. For instance, consider the following selection:

In this case, the second branch level has been selected. A branch level is a horizontal element of a branch. In this case, it is the horizontal element that contains the XIC _Example_DINT.1.
With this selection, I can cut, copy, paste, delete, etc. just that one branch level without disturbing the rest of the branch structure. In other words, I can do what I like with that branch level without messing up anything on the uppermost branch level (with XIC _Example_DINT.0) or the lowermost branch level (with XIC _Example_DINT.2).
Clicking and dragging a branch level
You can click and drag the selected point shown above to move a branch level. This technique can be used to reorder branch levels within a branch or to move a branch level to an entirely different branch, even in another routine. You can find more info on this in Tip #11, below.
The right side of a branch: the whole branch structure
The right side of a branch, on the other hand, acts as the selection point for the entire branch. You can see that this is the case because when you click the right side of the branch, the entire vertical element is highlighted.

When you make a selection as shown above, any action you take affects the entire branch. If you choose to cut, copy, etc. at this point, all branch levels will be affected as one. In this case, that means that all 3 of the horizontal elements with XIC _Example_DINT.0 - .2 would be affected as a group.
Most of the time, if you are reusing branched logic from one rung to another, you will want to copy the entire branch structure by selecting the right side, and then pasting it where you would like to use it again.
Clicking and dragging a branch
Clicking and dragging the right side of the branch does not move the entire branch structure. Instead, it redefines what is enclosed within the branch. If there is an instruction outside of the branch that you wish you enclose within the branch, you simply drag the right side of the branch past that new instruction to assimilate it.
There is a limitation; you can drag a branch around another branch, but you can’t really drag a branch into another branch. To move an entire branch onto a branch level within another branch, you may need to select the right side of the branch you want to move, cut it, and then paste it where you want it to go.
Tip #3: Use Ctrl+G For “GO RIGHT TO IT”
My next RSLogix 5000 tip for you is to use the Go To shortcut. If you already know where you’re headed, Ctrl+G can be a big time saver.
Already know which rung you need in this routine? Ctrl+G to GO RIGHT TO IT. Type the rung number and hit enter, and blammo, you’re there.
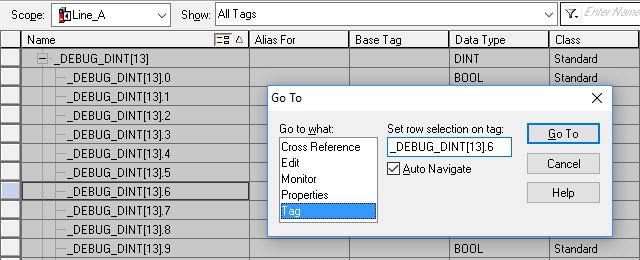
Already know which tag you need in Controller Tags or Program Tags? Ctrl+G to GO RIGHT TO IT. As you start typing, RSLogix will scroll to your tag. It will even trace into an array. If, for instance, you need the 130th element of an array, press Ctrl+G. By the time you’ve typed YourArrayTagName[130, that element of the array will be selected for you in the tag database.
Tip #4: Use The Keyboard To Move Around In RSLogix 5000
Much of what you can do with the mouse, you can do with the keyboard. I’m not saying that it’s always quicker to move around with the keyboard – but sometimes it is. What’s important is to know the right tool, technique, or shortcut to use at the right time. For this RSLogix 5000 tip, you’ll find some common keyboard shortcuts below; this list is far from comprehensive. Have some RSLogix 5000 keyboard shortcuts of your own that aren’t on this list? Tell me about it in the comments at the bottom of the page!
Move quickly between open windows within RSLogix 5000

As you work, you’ll often have the ladder editor, cross reference, controller tags, and other windows open at the same time within RSLogix 5000. Knowing how to quickly move between windows can save you time and make you a faster programmer.
As an example of an inefficient use of the interface, I’ll often see people return to the Controller Organizer multiple times to open a routine that is already open in the ladder editor. They would be much better off simply switching between windows that are already open. Most of the time, if you only have a few windows open within RSLogix 5000, it’s quickest to tab between open windows using the keyboard shortcuts.
- To move to the next open window, press
Ctrl+Tab - To move to the previous open window, press
Ctrl+Shift+Tab
If you have many windows open, it may be quicker to get where you’re going through the GUI. To do so, click the Window menu and select the appropriate window, as shown above.
Move quickly between multiple instances of RSLogix 5000
If you’re working on two neighboring processors at the same time, or if you’re working back and forth between online and offline projects, it is often easier to use the keyboard to switch between your RSLogix 5000 instances.
- Use
Alt+Tabto go to the next open application within the Windows environment - Use
Alt+Shift+Tabto go to the previous open application within the Windows environment
Rotate through open routines with the keyboard

There’s another great pair of keyboard shortcuts available for moving between routines on the ladder editor. It’s not uncommon to be working back and forth between two or more routines. Having to switch between the keyboard and mouse when you need to go to another routine can slow you down. Luckily, the following keyboard shortcuts are available:
- Use
Ctrl+PageUpto bring up the previous routine. If you have three routines open, and the second routine is active,Ctrl+PageUpwill make the first routine active - Use
Ctrl+PageDownto bring up the next routine. If you have three routines open, and the second routine is active,Ctrl+PageDownwill make the third routine active
Navigate quickly within a routine

It can be tedious navigating through routines with many rungs. There are a couple of keyboard shortcuts to keep in mind that can help you to get where you’re going faster:
- With a rung selected (as shown above), use the
Up ArrowandDown Arrowto navigate through the routine one rung at a time - You can use
PageUporPageDownto move up or down in the routine a page at a time - Use
Ctrl+Hometo go to the very top rung - Use
Ctrl+Endto go to the very bottom rung - On a rung, you can use the arrow keys to move left and right on a rung or branch and the up and down arrows to move up and down between branch levels or sections of an instruction
Tip #5: Understand The Slider Bar On The Right Of The Screen

When you’re looking for a certain rung or tag, you can use the slider bar to navigate the screen. The slider bar has three means of interaction:
- The arrows at the top and bottom of the slider bar will move the ladder up or down about one line of text per click
- You can click and hold the arrow to move more quickly, still moving about one line of text at a time
- These arrows provide the slowest motion available through the slider bar
- You can click the blank space on the slider bar to move up or down about a page at a time
- Clicking anywhere in the blank space of the slider bar below the slider will move you down about a page
- Similarly, clicking anywhere in the blank space above the slider will move you up about a page.
- You can click and hold in the blank space to move quickly up or down about a page at a time
- This method provides a moderate rate of motion through the ladder
- You can click and drag the slider itself to move very quickly through the routine
- This is the fastest means of moving through the routine using the slider bar
Tip #6: When Debugging, Always Check To Make Sure You’re Online

I know it sounds obvious, but I promise you this gets everyone from time to time. When you walk up to a terminal and your processor’s project is already open in RSLogix 5000, the first thing you should do is check to make sure that the project is currently Online with the processor. It’s very easy to waste minutes of downtime chasing a signal that won’t change state – only to realize that you’re still Offline.
Make it a habit. Whenever you open or switch to a project where you need to do some debug, make sure that the first thing you do is check that it’s Online.
Tip #7: Quickly Duplicate Logic Offline Using Find And Replace
RSLogix 5000 is an awesome piece of software, but like any development environment this complex, there will be some “features” that can get in your way. For instance, RSLogix 5000 tries to save you from yourself in a few different ways. One thing that you cannot do when making Online edits is Find and Replace.
Let’s say I wanted to duplicate the following logic for another application:

The new application is “SprocketY”, so everywhere that you see “SprocketX” above, I want to replace the “X” with a “Y”.
If I copy and paste this logic while I’m Online, I cannot use Find and Replace to quickly change “SprocketX” to “SprocketY”. I would be forced to edit each individual reference to SprocketX. Each operand and description would have to be edited individually to change everything over for SprocketY.
This might not be a big deal if you’re changing 4 or 5 references on 1 or 2 rungs, but when you’re talking about maybe 15 references or more, this can be very time-consuming. In addition, doing a lot of small, manual changes opens you up to the possibility of making mistakes.
Use Find and Replace to change a lot of references at once
You can make the process much easier by performing the edits Offline in another project. RSLogix 5000 will allow you to Find and Replace in Offline projects. For this little part of our RSLogix 5000 tutorial, here’s how you would quickly change many tag and/or comment references Offline:
- Open another copy of the project with the logic you need to duplicate
- In the Offline project, open the routine with the logic you want
- Click on the “0” to the left of the first rung in the routine
- Press
Ctrl+H. This is the keyboard shortcut for “Find and Replace” - In the Find What box, enter the existing tag name (“SprocketX”)
- Next, in the Replace With box, enter the new tag name (“SprocketY”)
- In the Find Where dropdown, select Current Routine
- Click Find Within >> at the bottom right
- Click Ladder Diagrams
- Make sure Instruction Operands is checked
- If you also want to change to occur in comments, make sure Instruction Main Operand Comments and/or Rung Comments are checked as well
- Click Replace to step through each instance of your existing tag, or Replace All to replace all instances at once
Now that you’ve prepared your logic Offline, you can copy it into your Online project. Select the rungs you modified and copy/paste them into your Online project.
Using Find and Replace in an Offline project will allow you to quickly change many references to a tag, without having to edit each individual reference.
Tip #8: Stay On The Monitor Tags Tab

For whatever reason, RSLogix 5000 will often move very slowly through the Controller Tags or Program Tags if you are on the Edit Tags tab. Don’t let it waste your time. If you need to scroll through the tag database to find a certain tag, first switch over to the Monitor Tags tab. I rarely find I need to use the Edit Tags tab.
Tip #9: Understand All 3 Sections Of Typical Instructions
When setting up instructions and their descriptions in RSLogix 5000, understanding the way the instructions work will help you to create your logic more quickly and with less frustration. For this RSLogix 5000 tip, I want to help you to understand the various sections of typical instructions. Most instructions that appear as a coil or contact (or a similarly-sized element) on the ladder have 3 sections that each behave differently when clicked, dragged, etc.:
- Description
- Tag Name
- Instruction Type

The (common) types of instructions that fit this format are:
XIC, XIO, OTE, OTU, OTL, ONS, RES
Instruction Type Section

The lower-most section of a typical instruction is the instruction type. The instruction type dictates the logic that is performed on that tag. Do you check the status of the tag? Do you “energize” the tag’s output (set the tag value to 1)? Does the tag hold a One Shot status?
The instruction type can be changed without disturbing the tag name. This can allow you to save keystrokes by copying another instruction that has the tag you need. You can then paste in the copied instruction and simply change the instruction type. For example:
You want to check the ON status of the _Example_Bit tag of type BOOL. You could easily add an XIC and then set the tag name to _Example_Bit. However, if another instruction with _Example_Bit is already nearby, it may be even quicker to simply copy/paste that instruction and then change its instruction type.
This can be especially helpful with very long tag names or tag names that are difficult to type or remember. To change the instruction type, you simply double-click the instruction type, as described below:
When the instruction type is double-clicked:
Double-clicking the instruction type allows you to change the instruction type without disturbing the tag name or description. After you double-click the instruction type, the current type will be shown in text and highlighted. Any text you enter when the instruction type is highlighted will overwrite the current type. So, after double-clicking, if you know the new instruction type you want to use, simply start typing it in. The new instruction type will auto-complete as you type.
If you don’t know the instruction type you need, then after double-clicking, you can use the drop-down arrow on the right of the highlighted instruction type. This drop-down arrow will open a list of available instruction types:

When the instruction type is clicked and dragged:
Clicking and dragging the instruction type will either move or copy the instruction to a new location.
- If you are offline, or if you are online and you drag an instruction from a rung you are editing to a rung you are editing:
- The instruction will be moved from the original rung to the new rung
- If you want the instruction to be copied (if you want the original instruction to stay in place and a new instruction be made at the new location), then hold the
Ctrlkey while clicking and dragging the instruction
- If you’re online, and you drag an instruction from a rung that you are not editing to a rung that you are editing:
- The instruction will be copied; the original will remain in place, and a copy will be made on the new rung
This allows you to quickly replicate an instruction when you are reusing the same or similar instructions throughout your logic. For more information on the click-and-drag behavior for instructions, see the “Look For The Drop Points When Clicking And Dragging” tip below.
When the instruction type is right-clicked:
A context menu will pop up with common actions you can take. Some commonly used actions here include Cut, Copy, or Delete Instruction, Toggle Bit, and Edit Main Operand Description. Note that all of these common actions have corresponding keyboard shortcuts. Most of the time, it is quicker to use the keyboard shortcuts than to right-click and pick the action out of the menu. So, learn those RSLogix 5000 hotkeys!
Tag Name Section

The middle section of typical instructions contains the instruction’s tag name. The tag is the name you’ve given to some address in memory at which the data that you’re working on is stored. For instance, say you want to check the status of a prox. You might tie the prox’s raw input from the junction block to a memory tag to make the tag name more readable. Your tag for a Station 2 “In Position” prox on a conveyor might be something like S02ConvInPosProx.
Each tag can have a description. If a tag consists of smaller elements (for instance, a DINT consists of 32 BOOL’s – read more here), each element can typically have its own description. Descriptions are tied to tags. In other words, if you change the tag name that’s associated with a certain instruction, the contents in the description section will change to reflect the description for that tag.
Here is the behavior of the tag section of an instruction when manipulated in the ladder editor:
When the tag name section is double-clicked:
Double-clicking an instruction’s tag section allows you to change which tag is associated with that instruction. Like the instruction type section above, after you double-click the tag name, the tag name will be highlighted, and any text you enter when the tag name is highlighted will overwrite the entire tag name.
Also like the instruction type section, if you don’t know the tag name you need, then after double-clicking, you can use the drop-down arrow on the right of the highlighted tag name. This drop-down arrow will open a searchable tag list:

When the tag name section is clicked and dragged:
When you click and drag the tag name, you can plug it in to other instructions. This allows you to quickly replicate a tag name when you are reusing the same or similar tags throughout your logic. For more information on the click-and-drag behavior for tag names, see the “Look For The Drop Points When Clicking And Dragging” tip below.
When the tag name section is right-clicked:
Right-clicking an instruction’s tag name section pops up a context menu. The tag name context menu has all of the options shown on the instruction type’s context menu (described above), plus some additional options.
Some of these additional options will get some high mileage. When debugging ladder logic, you’re often chasing missing conditions back several layers to find a certain signal or condition that your process needs. The “Go To Cross Reference For…”, “Monitor…”, and “Trend…” options will serve as go-to’s in your quest to figure out why your machinery stopped moving.
It’s worth pointing out that these extra options are only available if the tag name is right-clicked. A common mistake that RSLogix 5000 users make is right-clicking the description or instruction type and looking for the Cross Reference or Monitor options. Don’t do it! They won’t be there. Make sure to right-click the tag name (or better yet – use Ctrl+E, the keyboard shortcut for cross reference).
Tag Description Section

The uppermost section of your typical instruction is the description. As mentioned above, an instruction’s description is tied to the tag. Make sure you have the correct tag in the tag name section before changing the description.
You can edit the tag description by double-clicking the description section, by right-clicking any of the three sections and selecting Edit Main Operand Description, or by selecting any part of the instruction and pressing Ctrl+D. Here is the expected behavior when manipulating an instruction’s description section:
When the description section is double-clicked:
The description editor opens at the top of the screen. Double-clicking the description section is the same as selecting Edit Main Operand Description or pressing Ctrl+D with any portion of the instruction highlighted.
Note that to copy a description you want to reuse, you have to copy the description from the description editor. In other words, you have to first edit the description to be able to copy it. A common pitfall when attempting to copy a description is to right-click the description and click Copy Instruction. This will not get you what you want! Here’s a common recipe to copy a description from one tag to another with blinding speed:
- Left-click the instruction with the description you want to copy (this will highlight the instruction)
- Press
Ctrl+Dto enter the description editor - Press
Ctrl+Cto copy the highlighted description - Left-click the instruction where you want to paste the description
- This will close the description editor and highlight the new instruction
- Press
Ctrl+Dto enter the description editor - Press
Ctrl+Vto paste in the description
Bing, bang, boom, man! Do it like that and it’ll be fast.
When the description section is clicked and dragged:
Clicking and dragging the description section has an identical effect to clicking and dragging the instruction type. It will move or copy the entire instruction as described for instruction type dragging above.
When the description section is right-clicked:
Right-clicking the description section is also identical to right-clicking the instruction type. It will pop up a context menu with options such as Cut, Copy, Edit Description, etc.
Tip #10: End Description Editing Just By Clicking
You may have noticed above that I did not close the description editor when I was done editing. I simply clicked off.
Many tasks in RSLogix 5000 can be executed in a variety of different manners. For instance, there is often a keyboard shortcut, context menu option, and GUI interface for performing a given task.
The same is true of the task of closing the description editor. To my knowledge, there are three ways to close the description editor and commit any changes you’ve made to the description:
- Click the green arrow
- Press
Ctrl+Enter - Simply click anywhere in the ladder editor outside of the description editor

If I’m living on the keyboard, I do sometimes press Ctrl+Enter to exit the description editor. Most of the time, however, as soon as I’ve typed my description, I want to move on to the next thing. The ladder diagram editor permits you to do this by simply clicking anywhere in your ladder logic to apply any changes you’ve made and close the description editor.
Tip #11: Look For Drop Points When Clicking And Dragging
RSLogix 5000’s ladder logic editor provides you with visual indication of what will happen when you click and drag ladder elements. When you “pick up” most ladder elements, various drop points appear on the screen showing you where your ladder element can be dropped.
It’s important to watch the drop points every time. RSLogix 5000 seems to have some pretty quirky behavior as far where items go when you click and drag them. It’s very common to drag an object to the general area where you want it, only to have RSLogix 5000 place it somewhere you did not at all intend. If you pay attention to the drop points, you will always know exactly where your instruction is going to end up when you release the mouse button.
Drop points are grey objects that appear on the screen once you start clicking and dragging a ladder element. As you drag an element around in RSLogix 5000, a single drop point at a time will turn green to show you where that ladder element will be placed if you let go of the mouse button at the mouse cursor’s current location.
Clicking and dragging instructions
To click and drag an instruction, simply click and hold on the instruction type. The instruction type is the coil or contact (for XIC’s, OTE’s, etc.), the instruction name (for instructions such as MOV, MSG, GEQ, etc.), or the name of an Add-On Instruction.
As soon as you start to move the instruction around, drop points will appear. For instructions, the drop points that appear are small squares on the rungs and branches of your PLC logic. Look for the drop point where you want the instruction to be placed. Move the instruction until that drop point turns green. If the drop point at the desired location is not green, letting go of the mouse button will place the instruction in some other undesired location.

Clicking and dragging tag names
Tag names can be clicked and dragged from one instruction to another. Doing so allows you to very quickly populate instructions when a tag or similar tags will be used repeatedly. Dragging and dropping tag names will not remove the tag name from the original instruction. It will simply be copied to the new instruction at the drop point you select.
Once you click and hold on a tag name and start dragging, drop points will appear where the tag name can be placed. When clicking and dragging tag names, the drop points that appear are rectangles. Move your tag name to the desired location and make sure to watch for the appropriate drop point to turn green. Note that instructions with multiple operands will have multiple drop points into which a tag name can be dropped.

Clicking and dragging branch levels
You can click and drag a branch level to reorder the branch, move a branch level to another branch, or “dump” the contents of the branch level out to a new location.
When you “pick up” and start dragging a branch level, two types of drop points will appear:
- As though you were dragging an instruction, the same small squares on the rungs and branches of your ladder will appear. These squares will behave the same way as an instruction in the following sense: if you drag and drop a branch level to a drop point on a rung or branch, the contents of the branch level will be dropped at that drop point. The branch level itself will disappear
- Smaller squares will appear slightly left of any visible branches, above and below each branch level. Dropping a branch level onto one of these squares will move the entire branch level including its contents to that location. This allows you to reorder branch levels on a branch or to move a branch level to another branch

Clicking and dragging branches
As mentioned above, you can’t really click and drag a branch. Instead, clicking and dragging the right vertical of a branch changes what that branch encapsulates. It’s common to insert a branch and then have to drag the right vertical around nearby instructions to put them on the branch.
When you click and drag a branch, rectangular drop points will appear on the branch’s rung. Drag to any of these points to change what will be encapsulated within the branch.
If you wish to actually move the branch to another location, then instead of clicking and dragging, you would need to cut and paste the branch.

Clicking and dragging rungs
Lastly are rungs. Rungs can be reordered by clicking and dragging the rung itself (the box around the rung number to the left of the rung). Rungs can even be dragged into other routines.
Once you click and drag a rung, large drop points will appear above and below each rung on the current routine. Drop the rung at the desired drop point to move it from its original location.

Additional Information
There are a lot of great resources on the Internet for RSLogix 5000 tips and tricks, including comprehensive literature direct from Rockwell Automation. Here are some other excellent places to learn more about PLC programming using RSLogix 5000:
- PLCDev.com’s multi-level index of RSLogix 5000 tips and tricks
- DMCInfo’s short but interesting list of RSLogix 5000 tips
- Some literature straight from Rockwell Automation:
- Ladder diagram fundamentals in their Ladder Diagram Programming Manual
- Everything you could want to know about the built-in instructions in the General Instructions Reference Manual
- A deep dive on tags and data in the I/O and Tag Data Programming Manual
Thank you for reading!
I truly hope these RSLogix 5000 tips will help you to become a faster PLC programmer. When programming and debugging ladder logic in Rockwell Automation’s RSLogix 5000, knowing the interface can help you to quickly bring what’s in your mind to life on the screen.
If these tips were helpful for you, you can help support this blog by sharing this post on social media using the share buttons below. Lastly, plug in your email so I can keep you posted whenever I have new automation content for you! Thanks for reading and feel free to let me know your thoughts in the comments below or through the Contact link above. 🙂